
A step-by-step walkthrough for placing and closing your first leveraged perpetual trade on LeverUp — from wallet connection to position monitoring.
How to Open Your First Trade on LeverUp
Connect your wallet, pick a market, set your leverage, and open your first position — the full walkthrough in 6 steps.
What This Guide Covers
- Connecting your wallet to LeverUp
- Checking your available collateral balance
- Selecting a market and choosing your direction
- Setting order type, size, and leverage
- Confirming and opening your position
- Monitoring your trade and closing it
Before You Start
Make sure you have the following ready:
- A wallet connected to the Monad network (Rabby or MetaMask recommended)
- Supported collateral in your wallet — USDC, MON, LVUSD, or LVMON
- A small amount of MON for gas fees
Don't have assets on Monad yet? Read [How to Bridge Assets to Monad](#) first.
Step 1 — Connect Your Wallet
Go to [app.leverup.xyz](https://app.leverup.xyz) and click Connect Wallet in the top-right corner. Choose your wallet from the list and approve the connection request.

Make sure your wallet is set to the Monad network before connecting. Once connected, your wallet address appears in the header — that's your confirmation you're in.
Step 2 — Check Your Collateral Balance
LeverUp uses your wallet assets directly as collateral — there's no separate deposit step. Click the wallet dropdown in the top-right corner to see your balances across all supported assets: USDC, MON, LVUSD, and LVMON.
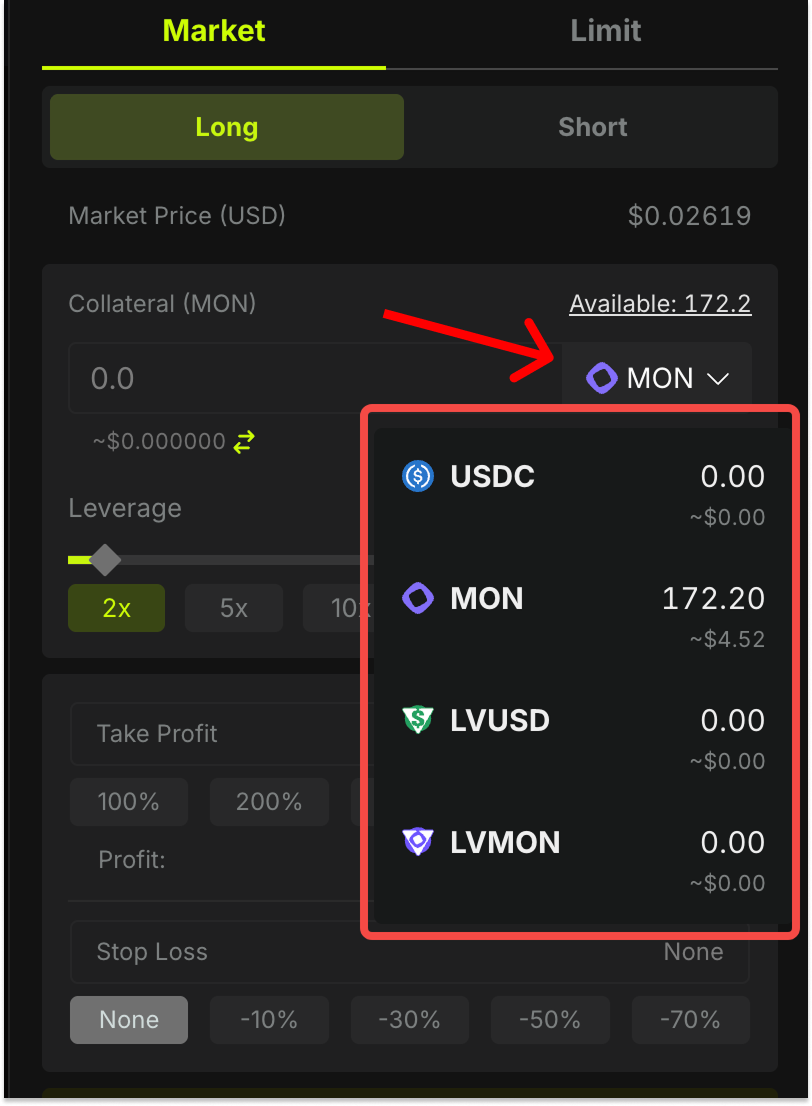
The amount shown in the order panel is your available margin for opening positions.
Step 3 — Select a Market and Direction
Tap the price ticker at the top of the screen (e.g. BTC/USD) to open the market list. Choose the asset pair you want to trade.

Then decide your direction:
- Long — you expect the price to go up. You earn a profit if price rises above your entry; you make a loss if it falls.
- Short — you expect the price to go down. You earn a profit if price falls below your entry; you make a loss if it rises.
Tap the green Long or red Short button to load the order form.

Step 4 — Set Order Type, Size, and Leverage
Order type:
- Market — opens immediately at the current price. Use this when you want to enter now.
- Limit — opens only when price reaches a level you set. Use this for planned entries.
Position size is the notional value of your trade. Your margin × leverage = total exposure. For example: $100 USDC at 10x leverage = $1,000 notional position.
Leverage ranges from 2x to 1001x on LeverUp. If you're new to perps, start between 5x and 10x — this gives you enough room to learn without liquidation sitting right next to your entry.

Before confirming, review the order summary carefully:
Entry Price
Expected execution price for your trade.
Liquidation Price
If the mark price reaches this level, your margin may be fully lost.
Fees
The cost to open the position, plus closing fees later on.
You can also set Take Profit and Stop Loss at this stage — recommended for all trades. A stop loss caps your maximum loss automatically without requiring you to watch the screen.
Step 5 — Confirm and Open the Position
When everything looks right, tap Open Long or Open Short. Your wallet will prompt you to sign a transaction — approve it.

After on-chain confirmation, your position appears in the Position tab at the bottom of the screen showing:
- Entry price
- Mark price (live)
- Unrealized PnL
- Liquidation price
- Position size and leverage

Step 6 — Monitor and Close the Position
The Positions panel updates in real time. **Unrealized PnL** turns green when you're up, red when you're down.
When you're ready to exit:
1. Tap Close next to your open position
2. Approve the transaction in your wallet

Your realized PnL settles back to your wallet balance immediately. The trade moves to the **History** tab.

Important Things to Know
Liquidation price is your hard limit. If the mark price reaches your liquidation price, your position is automatically closed and your margin is lost. Always know where it is before you enter.
Funding rate is the cost of holding a position over time. The rate shown on the market ticker (e.g. -0.0044% / +0.0021% per hour) is what you pay or receive while a position stays open. Factor this in if you plan to hold overnight.
One-Click Trading removes per-transaction wallet pop-ups. Enable it from the wallet dropdown under One-Click Trading once you're comfortable with the interface.
Common Mistakes
Opening with too much leverage. At 100x, a 0.85% move against you triggers liquidation. New users often reach for high leverage without realizing how close the liquidation price sits to the entry. Start low.
Not setting a Stop Loss. Leaving a position open without a SL means a sudden market move can wipe your margin before you can react. Set it before you walk away from the screen.
Ignoring the funding rate. A position that's up on PnL can still lose money if held long enough against a high funding rate. Check the rate before holding overnight.
Risk Reminder
Perpetual futures are high-risk products. Leverage amplifies both gains and losses. A $100 position at 10x leverage loses its entire margin if the price moves ~8.5% against you. Start with small positions while you get familiar with how the platform works.
What to Read Next
- How to Bridge Assets to Monad — Don't have assets on Monad yet? Start here.
- How Leverage Works on LeverUp — Understand exactly how leverage affects your PnL and liquidation price.
- How to Set Stop Loss & Take Profit — Learn how to protect your positions before the market moves.
